Friday, October 30, 2015

Selecting / Inviting All Friends

Selecting / Inviting All Friends


se

The Trick:

Selecting and inviting all of your friends in an event can be a tedious task, especially if you have more than 1,000 friends to send invitations to.
Luckily, this trick that allows users to select/invite all of their friends in an event or an app – with just one click.

How to Do it:

1)       Open Firefox and go to your Facebook page to invite all friends to like your page.
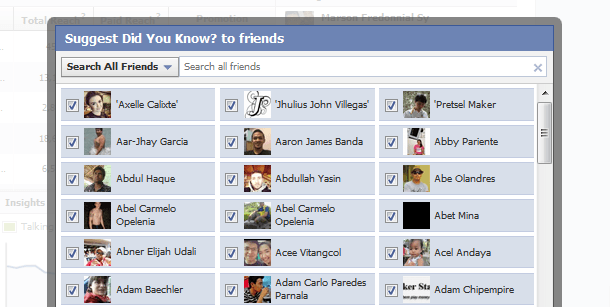
2)       Select “All Friends” instead of “Recent Interaction” so that you can invite all friends to your page. Scroll down till all of your friends are shown in the page.
3)       Press Ctrl+Shift+K and a small window will appear at bottom.
4)       Paste the below code in it and click enter.
javascript:elms=document.getElementsByName(“checkableitems[]”);for (i=0;i < elms.length;i++){if (elms[i].type=”checkbox” )elms[i].click()};
Hacks and Tricks like the above, should always be attempted using caution. We are not aware of anyone ever getting in trouble for using the above tricks, but in some cases they do bypass the intended functionality of Facebook, so be careful.
Which of these tricks is your favorite? If you have any new Facebook tricks you would like to share, please let us know in the comments!

Removing Your Last Name in Your Facebook Profile

Removing Your Last Name in Your Facebook Profile


SEJ 4

The Trick:

As part of Facebook’s security checks, you are required to completely fill out your account details to successfully create an account. By default, Facebook requires every user to enter their full name prior to saving their profile settings.
With this trick, you will be able to bypass Facebook’s restrictions and drop your last name.

How to Do it:

1) Open Mozilla Firefox (Firefox is required for this hack to work)
2) Go to Options -> Advanced -> Network -> Settings -> Connection Settings -> Manual Proxy Configuration
3) In the HTTP Proxy Field, enter 103.10.62.30, port 8080, or use any Indonesian Proxy.
SEJ 5

4) On your facebook profile, go to Account settings — > Change Language to BAHASA INDONESIA
5) Remove your middle name & last name.
SEJ 6


Thursday, October 29, 2015

How to Verify Facebook Page or Profile

 How to Verify Facebook Page or Profile


Facebook Page Verification method only four type of verification of pages or profiles in 2015 which are :-

  • Journalists
  • Popular Brand or Businesses
  • Government Officials
  • Celebrities
These are the four categories of pages or profile which can be verified by Facebook with the new method of verification facebook page or profile 2015. Suppose if you have any local business which is popular then Facebook may claimed your page if you are official. And then their is no need to submit any type of request to Facebook for page verification. They automatically claim your page as verified depend on some details and minimum requirements mention by Facebook.
If you have pages mentions above there will be chances to get your page or profile is verifiedand your facebook page must be official represent your local business or any personality and may be have some popularity on Facebook. when you create faecbook page fill all the real info about your or your business so facebook will get to know that your real person. you need to follow some instructions :-
1. Link To Your Profile or Page From Official Website on your page or profile which you want to verify facebook page 2015.
2. Provide accurate information in details about your business in About Section of Page or Profile.
In About section you must add :-
  • Significant long and short description,
  • Keyword who represent your business,
  • Email,
  • Official Website,
  • Products and
  • Verified Facebook Page Location with claimed business address
  • And Other details in Page Info tab.
To send them Facebook page verification “Request a verified Badge” request you need to follow the link given below and fill the real information.

Request for Facebook Page or Profile Verification :-

Open This link :-
Facebook Mentions is only available to people with verified facebook profiles or Pages. To request a verified badge for your Page, please fill out this form. Fill in the required information and send request and than you are done.
So here are the method to verify facebook page or profile 2015.If you face any problem Fell free to discuss in below comments and must share this article with your friends which want information about facebook page verification any where in the web and help other to get this information share in your facebook or in any social network stay tuned.

How To Make Invisible Page on Facebook

How To Make Invisible Page on Facebook


For this you way to follow following steps to make Facebook page with no name,
  1. First of all, click here to create your new Facebook page.
  2. Select a Category. Example- Entertainment and after that choose a category.
  3. Copy the code inside the brackets [᠌ ᠌ ᠌᠌᠌᠌᠌] and paste in the name field.
  4. Click on I agree to Facebook Pages Terms and then Get Stated.
Above is two facebook tricks how to make invisible/hidden profile or page on facebook. If you want more best facebook tricks 2015, hacks share this post, stay connented for more facebook and other tricks, hacks and tips, if you face any problem feel free to discuss in below comments,

How to “Friend” Someone on Facebook & Hide It From Your Status Updates

How to “Friend” Someone on Facebook & Hide It From Your Status Updates


I’m sure that this has happened to you before. Someone you have ties to, whether it’s a co-worker, your boss, or even worse, a parent, has finally discovered social networking and wants to be your newest Facebook friend.
For me personally, that’s no big deal. I’m fairly open about my online activities. Everything I write, Digg, or otherwise share goes through my FriendFeed to myTwitter then ultimately onto my Facebook (my, that sounds naughty). Besides that, just about everyone I’d consider a co-worker is already on Facebook, and would have little issue about my other Internet activities.
Putting all that aside however, imagine for a moment that I worked at Domino’s Pizza and that I don’t want my boss to know that I just became a fan of Papa John’s (writing this one’s gonna make me hungry). Here’s what I would do to hide Facebook status updates and keep that fact confined to my closer friends:
On your Facebook home page, you should see the ‘Settings’ menu close to the search field on your upper-right. Open that menu and go to ‘Privacy Settings’.
facebook privacy settings friends
On the next page, you’ll have four choices: Profile, Search, News Feed, and Applications. What you’ll want to edit here are your Profile privacy settings.

By default, everything on your profile is limited to your Friends and your Networks (your first Network is likely your city of residence, but you may have joined more). From the screenshot above, you can see that I’ve limited everything on my profile to my Friends and their Friends. Anyone else who visits my profile will only see that I have a profile, but will not see what’s on it.
In my example, you’re going to want to edit the setting on your Status Updates, since you don’t want your boss to know that you’ve “fanned” the competition. Click that dropdown menu and then select ‘Customize’.
You may want to tweak your overall privacy setting here, but what we’re aiming for is the “Except These People” list at the bottom of this dialog. Type out the name of any of your Friends to restrict that person from viewing anything in your Status Updates.
For all you faithful Facebook fans, we’ve got a lot of tips and tricks on how to make the most of the site. If you have any privacy tips or concerns to share, please drop them in a comment. I’m off to order pizza.

How to Place Facebook Chat On Firefox Sidebar

How to Place Facebook Chat On Firefox Sidebar


Facebook Chat is cool, at least it allows you to send instant messages to online Facebook contacts. However I’m not really a fan of the chat bar being at the bottom of the page, what if I’ve left Facebook but still wants to remain chatting with my Facebook contacts?
If you are using Firefox, you can place the Facebook Chat at the sidebar.
(Step 1)
Look for Bookmarks on the top navigation. Select Organize Bookmarks…
(Step 2)
Click New Bookmark… tab and enter the following:
(Step 3)
Launch the Firefox sidebar, click Facebook Chat and start chatting with your Facebook contacts within Firefox.
That’s it! Enjoy.